Custom drill
A Drill is a predefined route through different data dimensions, used to present the details behind values. This means it is possible to drill down to underlying data to find more detailed information about the figures calculations or comparisons are based on.
The standard drills, i.e. Time drill and Actual-Budget drill, contain all the nodes and organizations (including subnodes and suborganizations) that are included in the function. Some drills follow the predefined hierarchy in the node structure (fixed structure). In other cases, AGG functions create the drill pattern (variable structure).
Custom drills allow you to create your own drills, by adding new columns and changing the period and node type to be displayed. They have the same drill format as Actual-Budget drills.
Custom drills
Custom drills are also created in Shared web items. A custom drill allows you to create your own drill by adding new columns and changing the period and node type to be displayed.
It is also possible to drill further down in data that is stored in an external database by basing the drill on a Query table created in Templates. The external database must be uploaded as a Resource.
When a Custom drill is added to a function, the drill icon ![]() will appear in the Tool column of the function on the KPI page on the web. Simply click on the icon to see
the drill. You can also access the drill by clicking on the result of the function anywhere it appears.
will appear in the Tool column of the function on the KPI page on the web. Simply click on the icon to see
the drill. You can also access the drill by clicking on the result of the function anywhere it appears.
 Using Custom periods affects what is displayed in drills. When a Time drill is used with
a Custom period, the normal date range functionality will be ignored and the Custom year will define the size of the time drill period. In Actual-Budget drills and Custom drills YTD will be calculated for the Custom year not the calendar year.
Using Custom periods affects what is displayed in drills. When a Time drill is used with
a Custom period, the normal date range functionality will be ignored and the Custom year will define the size of the time drill period. In Actual-Budget drills and Custom drills YTD will be calculated for the Custom year not the calendar year.
How to create a Custom drill
Like Actual-Budget and Time drills, Custom drills are created in Shared web items. To create a Custom drill right click the Drill folder under which you want to create it and choose Add and Custom drill.
Properties
General
-
Name - the name "Custom drill" is automatically generated but it may be changed.
-
Description - an optional text describing the object
Configuration
-
Detail table - if you want to use the drill to drill further down than leaf level in external date, select the Query table containing the data. The Query table must already exist in Templates.
Audit
-
Modified by - the name of the last user to make changes to the object.
-
Last modified - the date and time when the object was last changed.
-
Created by - the name of the user who created the object.
-
Created - the date and time when the object was created.
Advanced
ID
-
ID - a unique ID for the object.
 By
default, Corporater BMP assigns consecutive numbers to new objects.
By
default, Corporater BMP assigns consecutive numbers to new objects. You can change the ID to a value of choice that can include either letters or letter and number combinations.
The ID mustn't contain only numbers, include special characters such as ) ( . * } { + < > [ ], or match the name of a default object type in Corporater BMP.
Access control
-
Read accessors - click the Edit button (
 ) and authorize one or more users and user groups to view the object on Web.
 -
Add accessors - click the Edit button(
) and authorize one or more users and user groups to add new objects to the object on Web. -
Write accessors - click the Edit button(
) and authorize one or more users and user groups to edit the object on Web. -
Delete accessors - click the Edit button(
) and authorize one or more users and user groups to delete the object on Web. -
Ownership - click the Edit button (
) and grant ownership of the object to one or more users and user groups. Users and user groups who own the object have full access rights to it.
-
Override access profile - select for the object's access control setting to outrank the object's corresponding access settings in profiles.
Configuring Custom drills
A Custom drill must have one or more columns, either Modifier columns or Node type columns. Each column contains a function that defines which data is to be displayed in that column in the drill.
To add a Node type column to a Custom drill, right click the Custom drill and choose Add -> Node type column. See Actual-Budget drills for information about Node type columns.
To add a Modifier column, right click the Custom drill and choose Add -> Modifier Column.
Modifier column properties
General
-
Name - the name "Modifier column" is automatically generated but it may be changed.
-
Description - an optional text describing the element
Configuration
-
Modifier function - a function that is used to adjust (modify) the function that owns the Custom drill, by adding time adjustments and/or changing node types on the nodes in the function, so that the drill can display different values.
A Custom Drill can only show certain variations of the nodes in the original KPI function, i.e. different time periods (e.g. to compare the current period with the same
period last year) or different node types (e.g. Actual figures compared to Budget figures). Thus a Modifier function is not a function in the real sense of the word but an adjustment of the original function.
A Modifier function replaces the nodes in the original function with so-called Modifiers. A Modifier is built by prefixing a node's position number in the original function with a $ symbol, e.g. $1 represents the first node in the function, $2 the second node, and so on. $A represents all of the nodes in the original function.
The Modifier function calculator is used to create Modifier functions. To open it, click the icon ![]() to the right of the
Modifier function field. The calculator is similar to the Function calculator, but instead of nodes it uses Modifiers.
to the right of the
Modifier function field. The calculator is similar to the Function calculator, but instead of nodes it uses Modifiers.
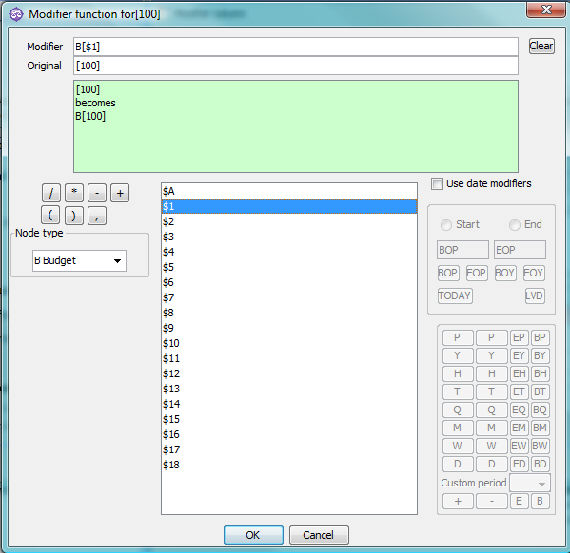
In the calculator the Modifier field at the top will contain the Modifier function you create.
The Original field contains the original function and the green area below it will show how the Modifier will affect it. Note that the area is red if the Modifier field contains errors.
In the middle of the dialog you will see a list of possible Modifiers that can be selected, $1, $2, etc. $1 represents the first node in the function, $2 represents the second node in the function, etc. Selecting $A will apply the adjustment to all the nodes in the function.
The simplest Modifier function is [$1]. Double click $1 to create it. The Modifier function [$1] does not modify anything; it just displays the value of the first node in the formula "as is". Similarly, [$2] displays the value of the second node, [$3] displays the value of the third node, etc.
To display several nodes separate them with commas like this: [$1],[$2],[$3]. Only one node may be referred to between two commas.
However, if you put a B in front of [$1], the Custom drill will display the value found in the Budget node type of the first node in the function. You can create more complex Modifier functions using the operators and node types on the left and the date adjustments on the right.
To modify several nodes, separate them with commas like this: B[$1], B[$2], B[$3].
The same Modifier can be used more than once in the same function. E.g. A[$1]-B[$1] will replace the first node in the formula with the difference (deviation) between the values in its Actual and Budget node types.
When you have created a valid Modifier function the area below the function will turn green and display how the Modifier function will affect the original function, so that you can check the result.
 Using [$A] in the Modifier function will apply it to all the nodes in the original function. E.g. to show values for the previous month for all node in the function write
[$A,BOP-1M,EOP-1M].
Using [$A] in the Modifier function will apply it to all the nodes in the original function. E.g. to show values for the previous month for all node in the function write
[$A,BOP-1M,EOP-1M].
Example 1:
Node 100 Income
Node 200 Costs
Function = [100] - [200]
If we want to use the budget value of Node 100 we can write B[$1]. If a Node is not included, the drill will display the values according to the original function, i.e. the same as using [$1].
We can show the budget values of nodes 100 and 200 in the drill by writing either B[$A] or B[$1], B[$2]
-
-
B[$1], B[$2] is valid. The drill will show the Budget value of Node 100 and the Budget value of Node 200
-
B[$1]-[$1], B[$2]-[$2] is valid. The drill will show the Budget value of Node 100 minus the Actual value of Node 100 AND the Budget value of Node 200 minus the Actual value of Node 200.
-
B[$A]-[$A] is valid. The drill will show the Budget value minus the Actual value for each node. In this example this gives the same result as B[$1]-[$1], B[$2]-[$2].
-
B[$1]- B[$2] is not valid
-
Modifier functions may also be enclosed in parentheses like this (B[$1]),(B[$2]). This is especially helpful when each part is a function, as in the example above: (B[$1]-[$1]), (B[$2]-[$2])
Example 2:
Node 100 Income
Node 200 Costs
Function = [100] – [200]
-
-
[$1] – uses the unmodified value of the first node, i.e. Node 100. The other node is not mentioned, so the value of Node 200 is also displayed unmodified.
-
B[$1]- [$1] – uses the Budget value of Node 100 minus the Actual value of Node 100. The other node is not mentioned, so the value of Node 200 is displayed unchanged.
-
-[$1] – uses the negative value of Node 100. The other node is not mentioned, so the value of Node 200 is displayed unchanged.
-
B[$1], -[$2] – uses the budget value of Node 100 and the negative value of Node 200.
-
Example 3:
In this example we have a function that contains 6 nodes. We want to show the difference between the budget values and the actual values of all the nodes except the first.
The Modifier function would look like this:
[$1], B[$2]-[$2], B[$3]-[$3], B[$4]-[$4]], B[$5]-[$5], B[$6]-[$6]
The first node could also be omitted, but we have included it for clarity. Either way it will contain the same value as the original function.
-
Override format - check the box if you want to change the default format of the Modifier column (Type = "Normal", Decimal = "2", Color = "Normal") (Status type = "Normal", Decimal places = "2", Color style = "Normal"). The fields below it will become active and you can enter the desired formatting information in (Prefix, Type, Decimal, Postfix, and/or Color) (Format type, Prefix, Postfix, Decimal places, and/or Color style). See Formatting for more information.
Audit
-
Modified by - the name of the last user to make changes to the object.
-
Last modified - the date and time when the object was last changed.
-
Created by - the name of the user who created the object.
-
Created - the date and time when the object was created.
Advanced
ID
-
ID - a unique ID for the object.
By
default, Corporater BMP assigns consecutive numbers to new objects. You can change the ID to a value of choice that can include either letters or letter and number combinations.
The ID mustn't contain only numbers, include special characters such as ) ( . * } { + < > [ ], or match the name of a default object type in Corporater BMP.
Access control
-
Read accessors - click the Edit button (
) and authorize one or more users and user groups to view the object on Web. -
Add accessors - click the Edit button(
) and authorize one or more users and user groups to add new objects to the object on Web. -
Write accessors - click the Edit button(
) and authorize one or more users and user groups to edit the object on Web. -
Delete accessors - click the Edit button(
) and authorize one or more users and user groups to delete the object on Web. -
Ownership - click the Edit button (
) and grant ownership of the object to one or more users and user groups. Users and user groups who own the object have full access rights to it.
-
Override access profile - select for the object's access control setting to outrank the object's corresponding access settings in profiles.