Query table
A Query table is a template that you define and use as the basis for producing charts and Table views and in Table functions. With a Query table it is possible to access data that is stored in an external database (data warehouse) and present it in a scorecard.
To use a database as connector in a Query table, it must first be imported as a resource. See Resources for more information.
How to create a Query table in Configuration Studio
To create a Query table go to the Template panel. It is a default panel in the Business Management Platform model and can also be found under Structure in the Windows menu, in the View menu, and in the Toolbar.
Right click in the Template panel and choose Add -> Category, or use an existing category to store the table template. Then right click the category and choose Add -> Table -> Query table. Double click the Query table to configure, or use the Properties panel.
Properties
General
-
Name - the name "Query table" is generated automatically but it may be changed
-
Description - an optional text describing the table
Configuration
-
Connector - click the Edit button (
 ) to see the resources that are available. The information necessary to connect to the resource is already defined in Resources.
It will only be possible to select valid resources.
) to see the resources that are available. The information necessary to connect to the resource is already defined in Resources.
It will only be possible to select valid resources. -
Query - Create your query using ordinary SQL-query syntax. Queries may contain dynamic (token) tags such as ${this.organisation.id}. You can refer to most properties for the current object and its organization, including Custom properties. Click
 to the right of the Query field to open the editor that will help you use tags correctly.
|
SELECT * FROM <table_name> WHERE <date_column> BETWEEN ${this.bop.sql} AND ${this.eop.sql} |
 this.bop.sql and this.eop.sql is a date format used by SQL databases in SQL queries. E.g. the following is a query that is often used in a Query table to select
all rows between bop and eop:
this.bop.sql and this.eop.sql is a date format used by SQL databases in SQL queries. E.g. the following is a query that is often used in a Query table to select
all rows between bop and eop:
Tags should not contain white spaces, especially between $ and {.
E.g. $ { this.object.id } could be misinterpreted. The correct syntax is ${this.object.id}.
 SQL queries in Query tables may not contain special characters such as terminating ;. Such characters must be removed.
Visibility
Chart template - choose the template to use when the table is converted to a chart on the web. Chart templates are configured in Shared web items.
Audit
-
Modified by - the name of the last user to make changes to the object.
-
Last modified - the date and time when the object was last changed.
-
Created by - the name of the user who created the object.
-
Created - the date and time when the object was created.
Advanced
ID
-
ID - a unique ID for the object.
By
default, Corporater BMP assigns consecutive numbers to new objects. You can change the ID to a value of choice that can include either letters or letter and number combinations.
The ID mustn't contain only numbers, include special characters such as ) ( . * } { + < > [ ], or match the name of a default object type in Corporater BMP.
Access control
-
Read accessors - click the Edit button (
) and authorize one or more users and user groups to view the object on Web. -
Add accessors - click the Edit button(
) and authorize one or more users and user groups to add new objects to the object on Web. -
Write accessors - click the Edit button(
) and authorize one or more users and user groups to edit the object on Web. -
Delete accessors - click the Edit button(
) and authorize one or more users and user groups to delete the object on Web. -
Ownership - click the Edit button (
) and grant ownership of the object to one or more users and user groups. Users and user groups who own the object have full access rights to it.
-
Override access profile - select for the object's access control setting to outrank the object's corresponding access settings in profiles.
Using a Query table to drill in external data
It is possible to configure a drill to show records from the external data source it is based on, when you click on a number in the drill.
-
All values in the expanded drill will have a link
-
Clicking on a value (link) in an expanded drill will open the source that the link is based on
-
By clicking the blue Menu icon
 in the upper right corner of the page, you can choose to export the drill details to Excel
The Detail table property in drills, including Time drills, Custom drills, and Actual-Budget drills, is a reference property that points to a Query Table in the Template model. Via this property the administrator can reference a Query table where the following context variables will be available:
-
${node}
-
${nodeType}
-
${organisation} or ${this.organisation}
-
${this.bop}
-
${this.eop}
These four steps must be performed in the correct order to create a drill with links to external data:
1. Create a Query Table in Templates
Right click in a folder in Templates and add a Query table.
2. Connect the Query table to the source table in an external system, defined in Resources
In the Connection property, connect the Query table to a Connector in Resources that is configured to read against the source system.
3. In Shared Web Items, connect the drill that will be used to the Query table
In Shared Web Items, choose the drill you want to use and in Detail table select your Query table.
4. In the Query table, create the parameterized query for the drill
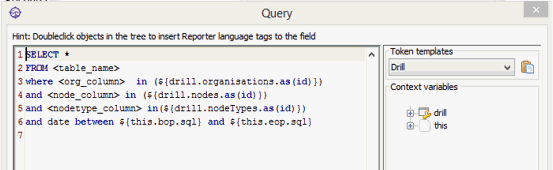
When the drill has been connected to the Query table, the Query table configuration will contain a template to create a query. When you click the Lookup button ( ), the editor that will help you create your query will be available. By clicking the Clipboard button ( ), a template of the query showing the syntax will appear, as shown below. Each of the variables enclosed with <> will need to be replaced with the settings relevant to your source table.
The drill template will not be visible in a Query table unless the table is connected to a drill. The drill parameters
will not work if the Query table is displayed in a regular Table view.
 A drill query does not use standard SQL to parameterize the node and organizational context. The drill has been designed where data at any level within the node or organizational structure can parameterize the context to query the data related to what is shown in the drill. This requires a different syntax from other parameterized queries. Most, but not all SQL commands are supported.
When the user clicks a value in the drill on the web, the variables in the Query table will be resolved with the context of the value in the drill, i.e.:
-
the ${node} context variable is based on the leaf node selected
-
the ${nodeType} context variable is based on the node type of the value
-
the ${organisation} or ${this.organisation} context variable is based on the organization currently selected in the drill, or the context if there is no organization table
-
the ${this.bop} and ${this.eop} context variables are based on the drill context / column selected