TRANSFORMER
Object target
Use an object target when you want to insert and update objects in the BMP system. You can specify what type of objects to create and where to create them, and then you can map columns in the source to object properties. When the project is run, the object target will create and update objects with properties that correspond to the columns of each row in the source.
It is also possible to use an object target to create linked objects, by selecting an object to copy from Templates.
 The Object target makes User target and Group target obsolete, and from version 4.0.3.0 onwards they have been removed and merged into this target.
Creating an object target
To create an object target, right click in the Transformer design panel, choose Target -> Object target. Connect it to the previous process as described in Processes. Double click the object to configure it.
Properties
General
-
Name - the name "Object target" is generated automatically but it may be changed.
-
Description - an optional text describing the object.
Configuration
-
Copy from existing objects - if checked, the Default system will be used to create the new object.
-
Model - from the drop-down list, select the model the objects should be inserted into; what you select in Model controls what appears in Type.
-
Type - choose the object type to insert or update from the drop-down list; what you select in Type controls what appears in Mapping below.
-
-
Look up source - look up source object based on Source column.
If Look up source is checked: -
Make link - If checked, and you choose an object from Templates, linked copies of the object will be created, i.e. the objects created will be linked to the Template object. If left unchecked, copies of the selected object, including subelements, if any, will be created.
 If Make link is checked and the source object found is not in the Template model, the row will be dropped out with
an error message in the log.
 -
Source column - Select the column from the source (Excel, etc.) that contains the IDs of other objects that will be used for the copy. If the value in the Source column does not represent the ID of an object in the system, the row is dropped out with an error message in the log.
-
Type - Choose the object type to insert or update from the drop-down list.
If Look up source is not checked: -
From existing object - Click on the icon to the right to choose an object to be copied in order to create new objects, instead of creating an empty object. You can select from objects in Defaults or from Templates in the BMP model to create a linked object. When Copy from existing objects is marked, From existing object must have content.
If you choose an object from Defaults, the new objects will be created as copies of the selected object, including subelements, if any.
 If Copy from existing objects is checked but From existing object is incorrectly
left empty, it will not be possible to add Mappings (below).
-
Object or a Model and Type, click the Add mapping button to start mapping columns in the source to object properties:
-
Add mapping button to start mapping columns in the source to object properties:
-
In the left-hand drop-down, select the object property to map to, then select a column in the source in the right-hand drop-down. The properties that are available are specific to the Object or Type selected above.
-
Click Add mapping again to create a new mapping row. Continue until all necessary properties are mapped.
-
|
To update a property that is a list, give each alternative in the list a value, starting with "0". E.g. to update Visibility, the alternatives would have the values:
|
|
Each formatting property should now be defined individually in order to be mapped, e.g. in individual columns in an Excel source,. |
-
Context date - select a date column from the source to use to set date properties such as Start and End dates, as well as historical properties, on the objects that are inserted or updated.
-
Operation - choose whether to "Insert only", "Update only", or "Insert and update".
Audit
-
Modified by - the name of the last user to make changes to the object.
-
Last modified - the date and time when the object was last changed.
-
Created by - the name of the user who created the object.
-
Created - the date and time when the object was created.
|
Example of importing a List Property set and items from an Excel source
Here is an example of how you can use an object Target to create List property sets and List property items in Shared web items:
- In Shared web items, create a category to hold the List property set.
- Create a Transformer project “Import List Property Set”
Source: Excel file
Your Excel file must contain at least the following information:
-
List property set Name.
-
It may also contain a column for ID.
Process: Calculation: “Parent” = the ID of your category in Shared web items
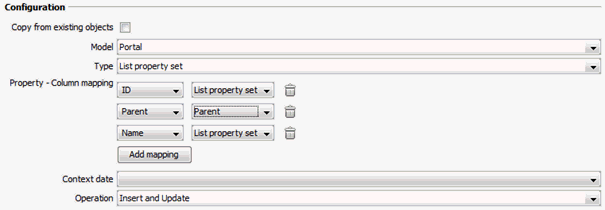
Target: Object target configured like this: (In this example, we use List Property set name as ID, but you may have a separate column containing the ID)

- Run the project.
- Create a Transformer project “Import List Property Items”
Source: Excel file
Your Excel file must contain at least the following information:
-
List property item: ID/Name and Parent.
-
It may also contain a column for “Active”, where applicable. “Active” = TRUE, “Not active” = FALSE (or empty)
 The first value row in the column may not be empty.
Process (optional): If your source does not contain a column with TRUE and FALSE values, you can create a new column with these values, based on other values in the source. Add a Calculation process and add a new Result field. In our example, all rows where Number is less than 4 should be given the value TRUE. In the Function field enter e.g. ${Number} < 4.0.
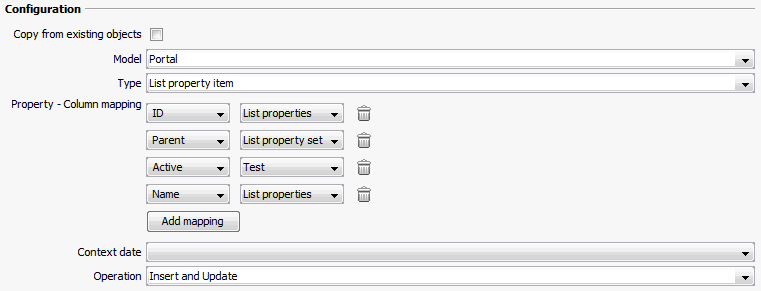
Target: Object target configured like this: (In this example, we use the same column as ID and Name)

- Run the project.