WORKFLOW
Event rule
An Event rule defines the conditions that must be met in order for the actions in the Workflow to be preformed. E.g. if a KPI has red status in a period then certain actions should be taken.
How to create an Event rule
Event rules are stored in categories, so make sure at least one category exists or add a new one.
Right click a category in the Workflow panel and choose Add -> Event rule. When you create a Workflow Event Rule, an Event schedule and a Logs folder are added by default.
 No Logs folders will be created automatically. If you do not need logging, the Logs folder may be deleted, and it will not be recreated automatically. If the folder does not exist, no logging will be done.
If a Logs folder exists, a Log is automatically created in it for each Action under the Event schedule and each Follow-up rule connected to the schedule.
It is also possible to create a Logs folder under an Action group, either instead of or in addition to the one under the Event rule.
Properties
General
-
Name - the name "Event rule" is generated automatically but may be changed
-
Description - an optional text describing the object
Configuration
-
Period type - choose the period type from the list, i.e. the time context to use when the Workflow is run, e.g. year, month, week. This is independent of the period type on each KPI.
 You can create filtering by KPI period in the rule configuration below.
-
Period relative to run date - an adjusting function that specifies which period's results to use, e.g. to use results from the previous month enter -1M. Click the icon to the right to use the Date calculator.
-
Rule configuration - create a set of conditions that define what you are looking for and where to look by selecting from the drop-downs in this section:
-
Select - what object type to search for. Choose from ordinary objects (organization, KPI, comment, etc.), table objects, table content objects, and logs.
-
from - where to search:
-
- Everywhere - search everywhere in the system, e.g. all KPIs
- Element list - click the icon and mark one or more elements to search in, e.g. search in only one specific organization
- Include subelements - check to search all subelements or uncheck to search only in the elements that are marked
 If Element list is selected when searching for Strategic initiatives or Risk assessments, all elements where "Affects"
contains the selected element type will be found.
Now define the conditions that are to be met by creating rules. This is done by selecting the desired properties, operations, and values from the drop-down lists. The first drop-down contains all the properties that belong to the selected object type, the second drop-down contains relevant operators (contains, not contains, = , !=, >, <, osv.). Examples of rules are 'Status = red', 'Name contains Finance'.
 If no rules/rule sets are created, all objects of the specified type will be found.
To create an new rule in a set click Add new rule. Select from:
-
All - objects to be found must meet all of the rules in the set
-
Any - objects to be found must meet one of the rules in the set
-
None - objects to be found must NOT meet ANY of the rules in the set
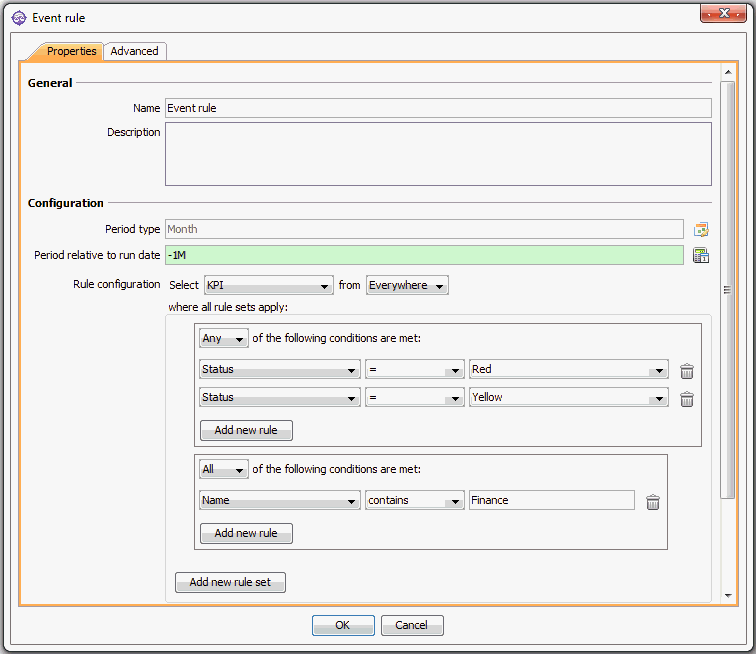
E.g. to find all KPIs where Status = red OR Status = yellow, select "Any". Status cannot be both red and yellow at the same time. See Example 1 below.
To create another rule set click Add new rule set. This new rule set will be in addition to ("AND") the first one.
 All rules and rule sets defined here apply to the object selected in Select above.
 Event rules will return all objects that meet the configured conditions, including invisible objects, and Workflow actions will also be performed on those objects. To
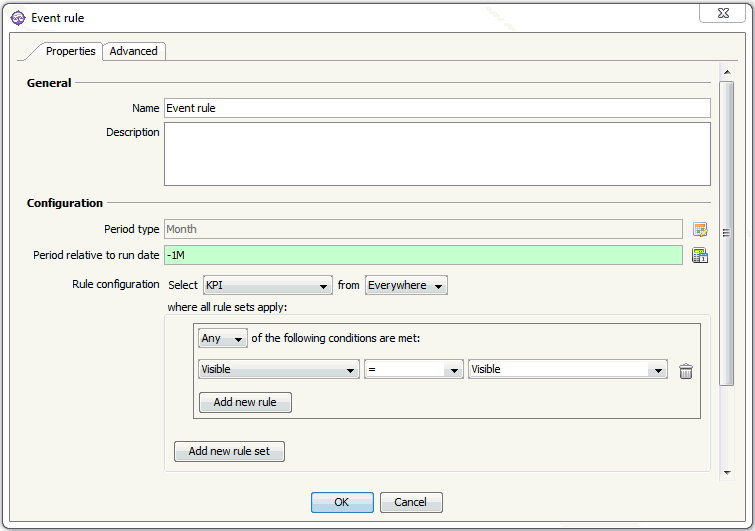
return only visible objects, and thus prevent the actions from being performed on invisible objects, the condition Visible = "Visible" needs to be part of the event rule configuration. See Example
2 below.
 A preview of an Event rule will show the sum of all rules and rule sets in the Event rule and any Additional rules.
Audit
-
Modified by - the name of the last user to make changes to the object.
-
Last modified - the date and time when the object was last changed.
-
Created by - the name of the user who created the object.
-
Created - the date and time when the object was created.
Advanced
ID
-
ID - a unique ID for the object.
 By
default, Corporater BMP assigns consecutive numbers to new objects.
 You can change the ID to a value of choice that can include either letters or letter and number combinations.
The ID mustn't contain only numbers, include special characters such as ) ( . * } { + < > [ ], or match the name of a default object type in Corporater BMP.
Access control
-
Read accessors - click the Edit button (
 ) and authorize one or more users and user groups to view the object on Web.
 -
Add accessors - click the Edit button(
 ) and authorize one or more users and user groups to add new objects to the object on Web.
 -
Write accessors - click the Edit button(
 ) and authorize one or more users and user groups to edit the object on Web.
 -
Delete accessors - click the Edit button(
 ) and authorize one or more users and user groups to delete the object on Web.
 -
Ownership - click the Edit button (
 ) and grant ownership of the object to one or more users and user groups.
 Users and user groups who own the object have full access rights to it.
-
Override access profile - select for the object's access control setting to outrank the object's corresponding access settings in profiles.
 To run an Event rule once, right click it and choose Run from the menu. Remember that all actions that are defined will actually
be performed. An Event rule may also be run via en Event schedule or an Action button on the web.
Example 1:
To list all KPIs with red OR yellow status AND name that contains "Finance":

Example 2:
To return all visible KPIs:
By default, Event rules return all objects, including the invisible objects, that meet the configured conditions. To return only visible objects, and thus prevent Workflow actions from being performed on invisible objects, use the condition Visible = "Visible".
