FORMS
Form schedule
A Form schedule is a plan for distributing a Scheduled Form, i.e. when the Form should be made available for the users in the Distribution list the schedule is connected to. You can specify when the distribution should start and stop, the storing period, how often the form should be distributed, when it is due, and when it expires.
To create a Form schedule, right click the Distribution list for the Scheduled form and choose Add -> Form schedule. A Distribution list may have more than one Form schedule.
 See Starting and stopping scheduled forms for information about activating the form.
Properties
General
-
Name - The name "Form schedule" is generated automatically but it may be changed
-
Description - an optional text describing the schedule
Configuration
-
Distribution frequency - an adjusting function specifying how often the form should be distributed, in relation to Start date, e.g. on the same date each month set +1M. Distribution frequency cannot be negative.
-
Storing period - an adjusting function specifying the period data is collected/stored for relative to the distribution date, e.g. if the form collects data from the previous month set Storing period to -1M
-
Due - an adjusting function relative to when the form is distributed, specifying when the response to the form is due, e.g. one week from distribution is +1W
-
Expiration - an adjusting function specifying when the form expires, e.g. +2W. It will not be possible to enter data into a form after the Expiration date.
-
Start date - the date and time when the form should be distributed for the first time
-
End date - the form will not be distributed again after the date and time specified here
 Configure Start date and End date by choosing from the calendar that opens when you
click the down arrow on the right. Click OK when finished. The calendar also includes buttons for "Now" and "None".
Configure Start date and End date by choosing from the calendar that opens when you
click the down arrow on the right. Click OK when finished. The calendar also includes buttons for "Now" and "None".
 The dates and times entered in Start date and End date should be relative to the server
time.
The dates and times entered in Start date and End date should be relative to the server
time.
Example:
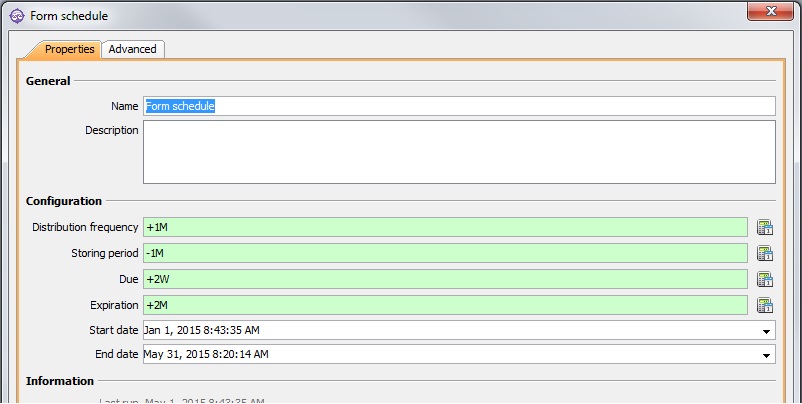
In this example the Form will be distributed once a month starting Jan. 1st, i.e. on Jan. 1st, Feb. 1st, and Mar. 1st, etc. It will not be distributed in June because End date is May 31st. Data that are registered in the form will be stored in the previous month, i.e. data registered in the March form will be stored in February. Each form will be due 2 weeks after distribution, i.e. Jan. 15th, Feb. 15th, and Mar. 15th. The forms will expire on Mar. 1st, Apr. 1st and May 1st, respectively.
If you only want to distribute the form once, set the Start date, End date, and
Distribution frequency so that it will only be distributed once before the end date. E.g. Start date: 1 Sept., End date: 20 Sept., Distribution frequency:
+1M
Information
-
Last run - shows the last date and time the form was distributed (Information only)
Audit
-
Modified by - the name of the last user to make changes to the object.
-
Last modified - the date and time when the object was last changed.
-
Created by - the name of the user who created the object.
-
Created - the date and time when the object was created.
Advanced
ID
-
ID - a unique ID for the object.
By
default, Corporater BMP assigns consecutive numbers to new objects. You can change the ID to a value of choice that can include either letters or letter and number combinations.
The ID mustn't contain only numbers, include special characters such as ) ( . * } { + < > [ ], or match the name of a default object type in Corporater BMP.
Configuration
-
Period type - the type of period data should be registered for: month, week, day, year, etc.
Access control
-
Read accessors - click the Edit button (
 ) and authorize one or more users and user groups to view the object on Web.
 -
Add accessors - click the Edit button(
) and authorize one or more users and user groups to add new objects to the object on Web. -
Write accessors - click the Edit button(
) and authorize one or more users and user groups to edit the object on Web. -
Delete accessors - click the Edit button(
) and authorize one or more users and user groups to delete the object on Web. -
Ownership - click the Edit button (
) and grant ownership of the object to one or more users and user groups. Users and user groups who own the object have full access rights to it.
-
Override access profile - select for the object's access control setting to outrank the object's corresponding access settings in profiles.
Distribution information
After a Form has been distributed, a Distribution entry appears under the Form schedule. A new Distribution entry will be created each time the Form is distributed, and its name will contain the distribution date and time.
By double clicking a Distribution entry you can see information about that specific distribution and its status.
It is also possible to make changes to a Distribution here. Right click one of the recipients in the Custom tab to bring up a menu where you can add, change, or delete a recipient. These changes will take effect immediately and will apply the next time the form is distributed.
Changes made in this way will not change the Distribution list itself, only affect who will receive future distributions of the form. To change the Distribution list
itself see Changing a Distribution list.